Estimated reading time: 6 minutes
Inserting an image in Word isn’t always a straightforward process. This is particularly so if you don’t know the best way to position and align an image so that it works with surrounding content. If this sounds familiar, then the steps below will show you exactly what you need to do to add and adjust an image in Word.
You likely already know how to insert (or replace) an image in Word. But if not, you can find out how here.
It might be a different case, however, when it comes to positioning and aligning an image. The good news is there’s a simple three-step process you can use to help you with this.
The first step is to position the image on the page. Then align the image in relation to surrounding text. And finally, resize the image as required.
Set the position of an image on the page
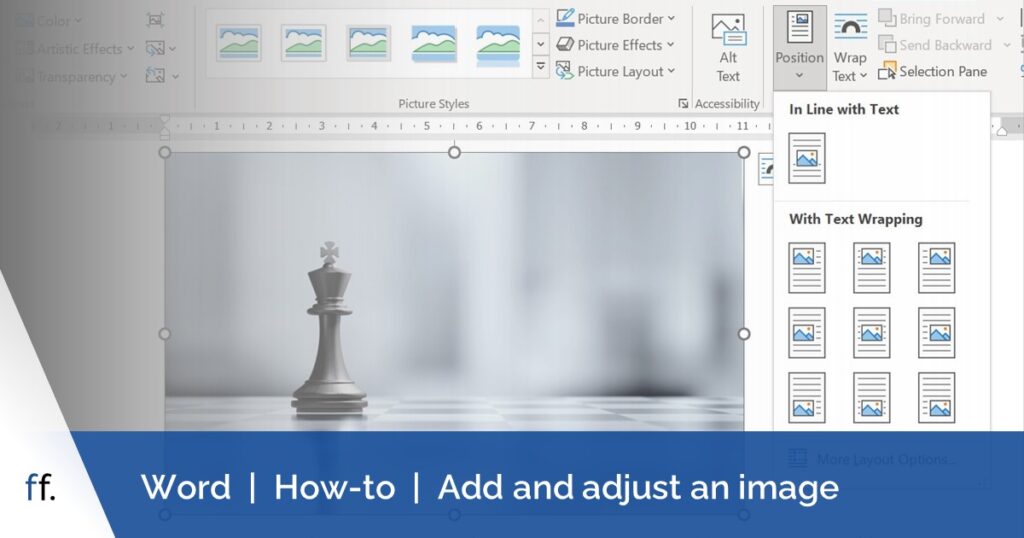
The quickest and easiest way to position an image in Word is to use a pre-set position.
The pre-set positions allow you to position an image In Line with Text or With Text Wrapping.

If you select In Line with Text, the image will sit in the paragraph in which you’ve inserted it.
When you choose an option from the With Text Wrapping section, the image will be placed as shown on the thumbnail. So, for example, in the middle left of the page.
Although the pre-set options are limited, they’re a good starting point. Because once you’ve selected an option, you’ll then only need to make minor tweaks to reposition the image if you wish to.
Here’s how to set the position of an image:
- Select the image;
- Click the Position button (Picture Format > Arrange);
- Click the thumbnail for the option which best matches where you want the image to sit on the page.
Note: if you’re unsure about the option you’d like to go with, hover over the thumbnails for a live preview. You may need to zoom out to page level to see the effects in your document (View > Zoom > One Page).
With the pre-set option selected, you can now adjust the position as required.
For images positioned In Line with Text, you’ll only be able to change the horizontal position of the image. That is, by using the paragraph alignment options to set a left, centred, or right alignment.
You have a bit more scope when it comes to adjusting images that are formatted With Text Wrapping. With this option, you’re able to modify the horizontal and vertical position of the image.
You may choose to drag and drop the image. Or, for a bit more control, select the image and then use the arrow keys on your keyboard to move it.
For even greater control, you can adjust the position of the image via the Position tab of the Layout dialogue box. The dialogue box allows you to set a specific measurement or placement for the horizontal and/or vertical position.
For example, you can format the image to sit centre relative to the left and right margins. This is the horizontal alignment. And vertically to sit at the top of the page, or at a specific point, such as 4 cm (1.57”) from the top margin.
Align the image with surrounding text
With the image positioned, the next step is to align it relative to surrounding text. That is, to specify the settings for how text wraps around the image. For example, so that text only wraps at the top and bottom of the image.
The method you use to align an image will depend on how the image is positioned. Remember, Word’s pre-set options allow you to position an image In Line with Text, or With Text Wrapping.
Images formatted using In Line with Text sit in the paragraph within which they’re placed. This should preferably be an empty paragraph (the norm). Given this, text wrapping won’t be applicable.
As with positioning images, you have a bit more scope when aligning an image formatted using With Text Wrapping.
For these images, Word’s default setting is to wrap text in a square fashion around the image. There are, however, several other text wrapping options to choose from.
Here’s how to choose a different option:
- Select the image;
- Click the Wrap Text button (Picture Format > Arrange);
- Select Tight from the menu that appears.
Note: be sure to again use live preview if you’re undecided about the option you’d like to go with.
You may then also wish to further tweak text wrapping settings. For example, to set the distance of the image from surrounding text. This is done on the Text Wrapping tab of the Layout dialogue box.
Resize the image
Finally, you may need to resize an image to suit the context of your document. There are a couple of ways to do this.
Method 1: by eye
Let’s start with the quickest method, which is resizing an image by eye. That is, by dragging and dropping the handle of the image.
If using this method, be sure to press (and hold) the Shift key while resizing the image. And only resize it using a corner handle. This will maintain the proportions of the image, and thereby avoid skewing it.
Here’s the process:
- Select the image;
- Press the Shift key, and click and hold a corner handle;
- Drag the handle inwards to decrease the size of the image, or outwards to increase its size;
- Unclick (or drop) the handle and release the Shift key when you’re satisfied with the size.
Note: when resizing an image using the above method, the image may move from its original position. If this is the case, simply reposition the image (if desired).
Method 2: specify an exact size
Another way to resize an image is by specifying an exact size via the Layout dialogue box. This is the safer method because it allows you to ensure the Lock aspect ratio setting is checked. In that way, you can avoid skewing the image when resizing it.
Here’s how:
- Right click the image, and select Size and Position;
- Ensure the Lock aspect ratio setting is checked;
- Insert the required height / width in the Height or Width option box;
- Click OK.
Whichever measurement you change (height or width), Word will update the other to maintain proportions.
Tip: when working with images, note that Word has a quick way to navigate to these. It’s the same method used to navigate to tables, which is covered in this article.